Sunday, November 6, 2011

10 Steps to self-sufficiency

The term self-sufficiency is usually applied to varieties of sustainable living in which nothing is consumed outside of what is produced by the self-sufficient individuals.  Without going all "creepy hermit in the woods" on you, becoming more self-sufficient is a great way to be environmentally friendly as well as provide a healthy lifestyle for your family.  Below are 10 easy steps to becoming more self-sufficient (without earning you "hermit" status).
1.  Start a garden
Gardening can be a very easy way to become more self-sufficient.  You can start out small with potted herbs on a window sill or tomatoes in a larger container on the back step.  Any bit of food that you can grow for yourself means that it is one less item that you are depending on big commericial farms for.  Not to mention the fact that you’ll know exactly what you put on your plants and on your table.

2.  Buy used

Yes you are still buying but this way you are buying items that would otherwise end up sitting in a landfill.  You are reducing your impact on the environment and reducing your dependence on new products and those pesky chain stores that sell them.  Buying used is also going to allow you to save money. 

3.  Get out of debt
Owing someone (the credit card companies) something is never fun.  It ties you to that company and makes it difficult to really be on your own.  Try to get out of debt and stay out of debt, saving up for bigger purchases and re-evaluating what you really need.

4.  Learn to sew / knit / crochet
Go ahead and cross this one off your list! Seriously though being able to make and or repair your own clothes is super handy.  You won't have to pay someone to do it for you and you can even use it to earn money (like we do at Etsy)

5.  Line dry your clothes
One less appliance running means a lower electric bill and that is always a good thing.  Also, line drying your clothes gives them that warm, sunshiney smell that doesn't hold a candle to dryer sheets (at least in my opinion)

6.  Explore alternative energy 
Currently, my husband and I are heating our home with a wood stove.  While i love the sound of a wood fire crackling I loved it even more when I heard how much our friends were paying for heating oil.  Its great to know that as long as we are responsibly harvesting our fire wood, we will always have a warm house.  

7.  Learn to "put up" fruits and vegetables
Learning to can, dehydrate or freeze fruits and vegetables while they are in season is fun and inexpensive.  When you are preserving your own foods, you know what you are putting in it (and what you are leaving out) which is a great way to keep your family full of healthy meals. 

8.  Ride a bike
Bikes are people powered and cars are not.  Biking is a great form of exercise and lets you cut down on the amount of gas you are using / having to pay for.  

9.  Use public transportation
If biking isn't for you (or even if it is) use public transportation when you can.  If we are all going to the same place, why do we all have to drive ourselves?

10.  Keep learning
There are sooo many ways that you can reduce your impact on the environment and take care of your family.  There are a ton of great blogs and books out there and remember every little step helps!

~Written by Kailyn Shippee, owner and crafter of Spotty Dog Crochet

Saturday, November 5, 2011

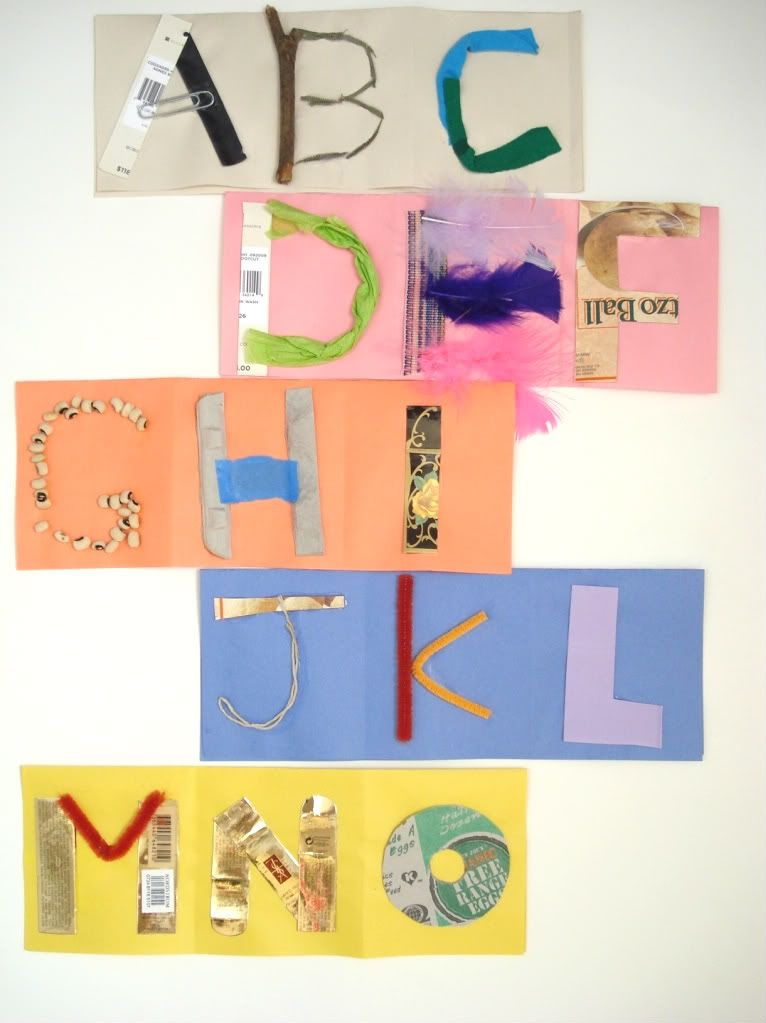
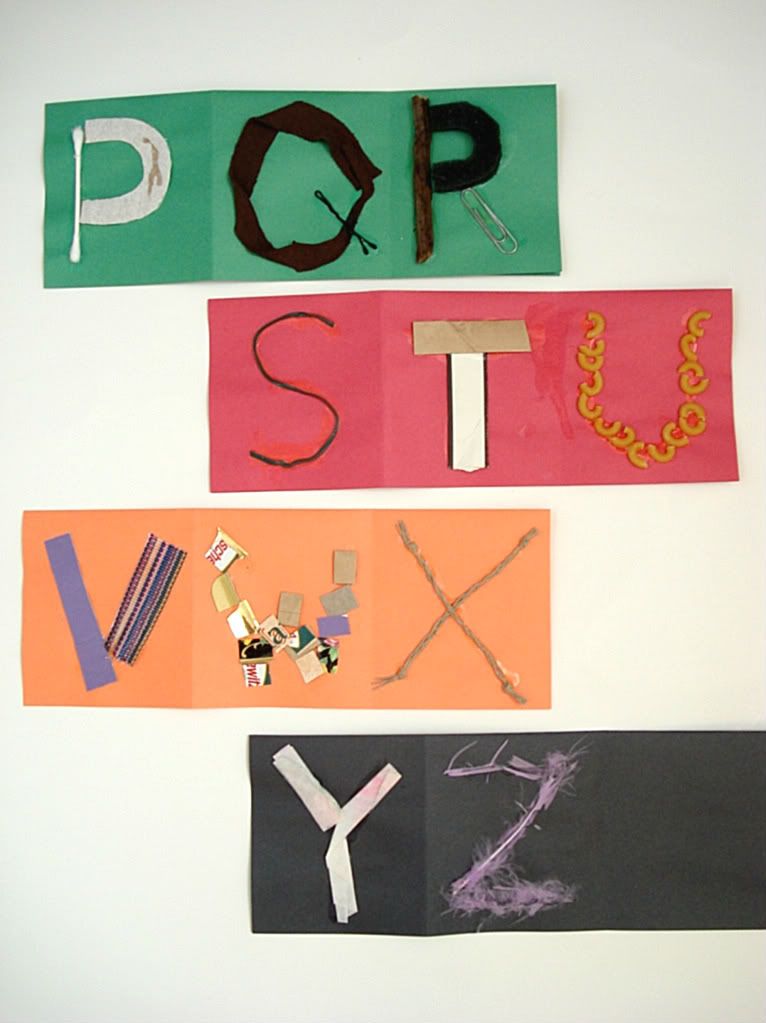
A Recycling Alphabet

This was a wonderful crafty art project for my 2 year old - making an alphabet from mostly recycled items (and a few craft supplies thrown in there).

I was inspired by this blog post about making books, and decided to make this into a little art project to show how fun it is to recycle! While ours isn't quite as "professional"-looking, I thought it was important to let my toddler help direct and choose materials, and glue them on the paper. I helped with all the cutting, but my toddler did the gluing.

Supplies needed:
- construction paper
- glue
- scissors
- various recycled and found materials including:

Here are some ideas of things you could use (we used most of these items!):

Natural materials: sticks, leaves, sand
Things found around the house: cotton buds, paper clips, straws, pasta, rice
Recycled materials: fabric scraps, egg cartons, packaging boxes, tissue paper, clothing hang tags, ribbons, string, twisty ties, coffee filters (used for previous art projects)
Craft materials: pipe cleaners, feathers

Directions:
1. Fold the construction paper the short way, then fold in thirds. Each third will contain a letter.
2. Apply glue as needed and construct each letter
3. Allow ample time to dry

We did this alphabet in about 3 sessions, and my toddler had a LOT of fun!

Friday, November 4, 2011

November!

'Turkeys & More!' by NorthernMom

Tune in for the November theme for the Etsyclothdiaper team. I've expanded this months theme to include Thanksgiving, pumpkins, fall colours and birds that may be migrating south for the winter!


Battling night time stink

It's a dreaded issue for cloth diaperers - "How do I get rid of these stinky night time diapers?"

My experience relates to my youngest son who was only wearing diapers at night. I was down to one in diapers, and only had a few in the pail at any given time. The amount of pee, plus the wait between washes was doing a number on my nostrils with the ammonia smell. The diapers were starting to even smell immediately after he wet in them.This can often lead to rashes or ammonia burns too.

Here's what I discovered: The ammonia comes from the bacteria that grows from the urine. The urine itself doesn't have ammonia in it. This meant I had to take care of a few things to get rid of the problem:
1. Rinse out and/or soak each night diaper in the morning (toilet, diaper sprayer, bathtub, sink, etc.). This gets the bulk of the urine out so it doesn't continue to sit and breed bacteria.
2. Add a splash or two of vinegar* to that morning rinse/soak for really smelly diapers (don't do this if you have hard water, it will make it worse I heard). Once I started this, my diapers rarely smelled right away in the morning.
3. Wash every 3 days, even without a full load. Any longer and it was asking for disaster.  I set my washer to the low water level setting.
4. Use HOT water.
5. Use plenty of detergent. So many diapering resources say not to use too much detergent to avoid buildup and repellancy issues, however, if you have stinky diapers, they are not CLEAN and you need more! (use an extra rinse, if necessary)
6. Use plenty of agitation - use the heaviest wash setting.
7. Do a full double wash, if necessary.

When the urine dries inside the diaper, it crystalizes. This makes it harder to remove from the diaper. You have to break this down with lots of water, agitation, and detergent. Certain fabrics retain it more than others, such as microfiber or thick layered diapers. Natural fabrics seem easier to keep clean when stink becomes a problem - cotton prefolds or bamboo might do the trick.

Do you have any tried and true solutions to night time stink? I have heard many people swear by soaking their diapers in Rock'n Green detergent, though I haven't tried it myself. 

*Some resources state that vinegar can deteriorate elastic in diapers. I never personally found this to be the case.

Thursday, November 3, 2011

Bright Rose Creations Giveaway Winner!

and the winner of Bright Rose Creations is Alexis!  Congratulations, we will email you with details.

Wednesday, November 2, 2011

Get to know Bonnie and the Holdens Landing BedBug diapers


I had the pleasure of interviewing Bonnie, of Holdens Landing Diapers for this blog submission. I chose to ask my question about BedBug fitted diapers, that Bonnie makes because they were my fav night time diapers for my daughter when she was still in diapers, and I think other parents should know more about this great product!


Did you design the BedBug yourself? I did. I co-slept with my son and he nursed all night long. I was tired of waking up in a puddle every morning, so I knew I had to do something. The original BedBug was the solution. The newer version, the BedBug Plus, was a collaborative effort between myself and my customers. I asked customers with heavy night wetters how to improve upon the BedBug. Their answer was to make it even more absorbent for the heaviest of nighttime wetters and the BedBug Plus was born.

Inside the Bedbug Plus


Have there been many changes to the design over the time you've been making the BedBug? There has been no change to the original BedBug; it's been the same since I introduced it in 2004. The Dreamscape version came about once i started embroidering. These embroidered BedBugs were introduced in 2007. The BedBug Plus, an even more absorbent night time fitted was introduced in 2009/2010.


What is unique about the BedBug that you think parents should know? The BedBug is designed especially for heavy wetters and is very customizable. You can choose from an inner fabric of organic bamboo velour or microfleece, a hidden core of microfibre or organic cotton fleece, a core placement for boys (in the front), girls (in the middle) or gender neutral (front and middle). There is also the BedBug plus for super heavy wetters, with all of these options you are sure to find a nighttime solution for your little one.
Inside the BedBug


What made you decide to sell on Etsy? I had been buying on Etsy for a bit and while browsing (at that time) saw a lack of high quality cloth diapers, so I figured I would give it a try. Etsy has been wonderful for Holdens Landing; i've never regretted the decision for a second.


Bonnie has generously offered to give away one Medium/Long BedBug to one of our Blog followers. Due to the freak October snow fall in the Eastern United States, we are unable to get a hold of Bonnie at the present time. Details on how to enter the give away and a picture of , what I am sure is a beautiful diaper will be posted as soon as we are able to get it up on the blog. Thank you for your patience .
Related Posts Plugin for WordPress, Blogger...