Monday, September 28, 2009

I just listed six new pocket diapers for Halloween at Etsy and have other Autumn themed diapers available as well. There are also a few SALE items through the end of this month.

I also stocked three diaper covers today at Avant-Garde. These two stockings will be the last of the diapers until November when I will have some covers for Christmas.

Have a peek below to see some of my recent goodies!


Sunday, September 27, 2009

Caring for Your Wool Diaper Covers

Ok, so you just received your new wool covers or perhaps you made your own, now what? Wool covers need different care compared to other covers. Don't worry! It's easy and you will develop your own routine.

Almost all wool covers need to be hand washed. If your wool is felted or pre-shrunk (as is the case with some recycled sweater covers) then it can be machine washed, however, it will last longer if you do hand wash it. I always recommend hand washing wool covers for best results.
You should always handwash your wool in room temperature water. Don't make the common mistake of thinking you need to wash it in cold water. The water should be the same temperature as your wool. Any extreme temperature changes, as well as agitation can cause your wool to shrink. So, never wash your wool with your diapers! Gentle handwashing in room temperature water is best.
You can wash your woolies in a lanolin rich soap, or simply add solid or liquid lanolin to your soapy water. The lanolin helps the wool retain its water-repellant nature. Lanolin is a wax like substance found naturally in wool. Lanolin naturally wicks moisture away from the baby's diaper, and makes the wool almost water-proof.

STEPS FOR WASHING YOUR WOOL COVERS:

What you will need:
  • Gentle soap (baby soap, baby shampoo, or olive oil soap work well)
  • large bowl or a sink that can be plugged for soaking
  • Lanolin (there are many different kinds out there...you can use the breastfeeding lanolin Lansinoh or PureLan, or you may be able to find it at the pharmacy)
  • Jar with a tight fitting lid
  • Clean, dry towel


Step 1:

First, you need to melt your lanolin. Take your jar, put some hot (doesn't need to be boiling) water from the tap (if it gets hot enough) and add a pea-sized amount of lanolin. You will need more lanolin if you will be lanolizing more than one item.


Add 1-2 drops of baby shampoo or soap to the jar. Put the cover on tightly and shake. The water should melt the lanolin, and mix the soap into it. The water should look somewhat cloudy and there should not be any oily drops floating on the surface. If there are, it is the lanolin that has not melted properly. All you need to do is add more hot water, or heat it a few seconds in the microwave (without the cover).


Step 2:

Add this soapy mixture to your bowl or sink. Then you need to adjust the water temperature so you don't shock your wool. Add some room temperature or colder water to bring the mixture to almost room temperature. Turn your covers inside out and place in the water. You can gently squeeze the covers in the water to help the water soak in. Be gentle with your wool. Allow to soak at least 20 minutes or more (no more than 24 hours).


Step 3:

Once your woolies are finished soaking, gently squeeze out as much water as you can. Do NOT wring! Lay your towel down on a flat surface, and roll up your wool covers with the towel. You can place the rolled towel on the floor and step on it to get as much water out.


Step 4:

Lay your woolies flat to dry. You can occasionally turn them right side out/inside out to help them dry faster. Do not put them in direct sunlight, as this can heat them up and may cause shrinking. Drying time can take up to 2 days. If the only cover you are using is wool, it may take a bit of planning, so that you have some clean ones to use when the others are being washed.


If you have any questions I would be happy to help. Please visit my blog at www.PetiteKrottCreations.blogspot.com . Or to purchase woolies, please visit me on Etsy at www.PetiteKrottCreations.Etsy.com .

Tuesday, September 8, 2009

September is "Out of this World" with Etsy's Cloth Diaper Team

Our Wahm's have been busy adding more diapers and covers for this month's theme "Out of this World".


Friday, August 28, 2009

Out of this world....

The Etsy cloth diaper team has been busy adding exciting new items to our September theme collections. From rocket ships to aliens, from diapers to covers to wipes, I think you'll agree that this month's selections are truly 'out of this world'.


Saturday, August 22, 2009

Getting Ready Chiquitos Diapers @ Erika's Chiquis


With summer sadly(very sadly)coming to a close and kids going back to school , I've been trying to start getting more diapers up.
I've bought some lovely flannel and knit fabrics. I have some of the cutest prints coming in September.
I hope everyone continues to enjoy the sunshine.
Erika
http://www.erikaschiquis.blogspot.com/ info on diapering on the right side

Tuesday, August 18, 2009

Think Halloween! Orange and Black diaper covers

I just listed a custom slot specifically for Halloween themed diaper covers...you pick the size and color combination (Orange with black trim or black with orange). Quick turnaround too! Fall will be here before you know it *sigh*, may as well be prepared!
- Jen at Winkydinks

Thursday, August 13, 2009

Prefold Trainers - size 1T-3T


Recently I won an interesting bid on Alchemy - to convert prefolds into trainers. After a few convos, the Momma and I had a plan for what we needed. I had not heard of making trainers using prefolds prior to this, but gosh, what a great idea! (It has since been brought to my attention that another Etsy seller, Simply Sanity Creations, has been making these as well.)


Little Moose Diapers' Prefold Trainers are made using prefolds which measure at least 17x12 (Preshrunk). If you Don't have any Prefolds on hand, I have some prepped and waiting to be converted. Are yours embellished - they will work just fine! You can have some pretty embellished Prefold Trainers.


I use FOE to bind while creating a snug fit on your little one. With side closing snaps, these Trainers make changing the poop accidents super easy. No more struggling to carefully pull a regular trainer down your little one's legs in the hopes of not making a mess.
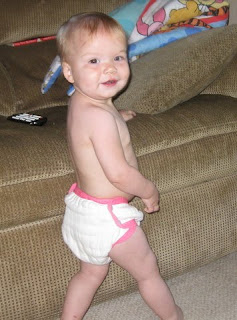


There are two ADORABLE models shown - an infant and a toddler. Photos were taken prior to the Trainers being washed, so you can be assured the fit will be better on your child, since the FOE shrinks slighty with the first washing.

Infant shown weighs 20 pounds, with the following measurements:

Waist - 16.25 inches
Thigh - 10.5 inches

Toddler weighs 32 pounds, with the following measurements:
Waist 20 inches
Thigh 12 inches

The Trainer itself has a rise that measures 17 inches. three rows of snaps make this Trainer fit throughout your little one's potty learning stages - no need to purchase additional sizes as they grow, saving you money in the end.

Related Posts Plugin for WordPress, Blogger...