Showing posts with label colibi. Show all posts

Saturday, October 22, 2011

How to make... a doll carrier

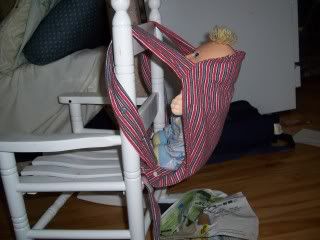
Making a doll carrier is easier than it looks.  It can make a great gift for toddlers and kids who want to do just like mommy (or daddy).  With the Holidays approaching ( I know we are still in October... ), it can make a great gift for toddlers and kids who want to do just like mommy (or daddy).

I made this one for my son when he asked to carry his one doll like I carried his baby sister.  Ok, I'll make you one, I said.  And naturally, when I was done, he did not want to use it anymore...

Please note that the carriers made with this tutorial are intended to carry dolls and stuffed toys, not real babies or child.

Anyways, here is how I made it, with upcycled fabric!

I took a men's flannel pj( you know, those with 2 inches hem...), so I could use the hem for the main piece:
  1. Cut one of the legs to make a 12in *16 in rectangle, keeping the big hem at the bottom.  Then a second piece that will be 2 inches shorter ( the one with the horizontal lines), so 12*14( if you serge the hem), or add a small hem allowance on that piece only.


  2.  Fold your pieces in half, and 2-3 inches from the top, cut a curve.
  3. Cut 2 : 4*20 inches ( straps) and one 3*28 inches ( waist band) from your fabric.  Ignore the white thing on the picture.
  4. Right side together, sew or serge along the long edge of the 3 long pieces, and turn right side out. Seam allowance is 1/4 in.
  5. Take you 12*14 pannel, and serge/overcast/hem the straight bottom part to prevent fraying.
  6. Make the straps:  Take the 2 20 inches tube and insert something to make them thicker, either some fleece, batting, or, like I did, some UNSTRETCHED Fold Over Elastic ( FOE).  Let both ends of the FOE show at the extremities.
  7. Sew a straight line on the straps to hold your «batting» in place, NO stretching.
  8. Take your 2 panels, right side together, and pin each strap  in the curve of the panels.  The straps will be hidden between the panels at this time and they will have a loose end.  Make sure that the extremities that will be sewn  show outside for 1/2 inch, like in the picture.
  9. Sew the 2 long sides and the curve together, like a U.  DO NOT SEW the bottom yet, you still need it to be open.
  10. Clip curves and turn. Topstitch the 3 sides you've just sewn.  You can also reinforce the straps at this point.
  11. On the shorter pannel ( the one you serged or hemmed the bottom edge), pin each loose strap ends 3/4 inch on the wrong side of the bottom edge of the fabric, approximately 1/2 in from the the side seam.  Make sure the straps are not twisted.  
  12. Sew each strap in place.
  13. Prepare your snapping material.  For each strap you will need 3 caps, 1 stud and 2 sockets.
  14. Put one CAP on the 3/4 inch hidden end of strap ( used as reinforcement), and one STUD or the right side of fabric. Snap.  Repeat for strap # 2.
  15. Take you 3*28 inches tube  and insert it in the big hem the the bottom of your bigger panel, and center it so each side is equal.
  16. Cut a 8 inch long piece of FOE or 1 inch wide elastic, insert it into the hem, pin and sew at each extremity of the hem.
  17. Now you can close the 2 panels together by sewing the shorter pannel to the longer one.  On the picture, I sew directly on my serged edge, as close as I can to the big hem. This side is the INNER side.
  18. Decide if you want the waistband to fasten with a knot or with velcro closure ( easier for toddlers).  If you decide on knots, just finish the raw edge and your alomsot done ( ie. see you in step 22 )  If you want velcro closure, keep reading:
  19. Cut your waistband shorter ( I did cut 3 inches on each side) and finish the raw edge.
  20. Sew a 1.5 inch HOOK velcro  at the end of one waistband strap, on the inner side ( toward the wearer).
  21. Hook is on the let side of the picture.
  22. Sew a longer LOOP velcro on the outer side of the opposite strap, closer to the main panel if you have a skinny toddler, like mine.  If you have some loop tape, it is even better, as you won't have to sew your velcro again as you child grow up.
  23. Now, back to snaps! You will apply 2 SOCKETS at the bottom of each strap ( the socket facing the wearer, so it is also facing the stud...), spacing them approximately 3 inches.  This will allow for your 2 years old as well as your 6 years old to wear it easily.
Et voilà!


Friday, October 7, 2011

Indoor Line Drying and Stains

Fridays are Cloth diaper Info days.  Yay!  But what does it mean ?  Each Friday a member of the Etsy Cloth Diapers team will share tips and infos about cloth diapering.

And today we start with : Indoor line drying.

Why ?  Because not everybody likes/want/can machine dry their diapers, for many reasons.  Usually for them, line drying or rack drying is the obvious choice.

 That's is where I, Marie-Aude from Colibi Créations, have a problem.  I live in Canada, where half the year the weather is not exactly appropriate for outdoor line drying.  It gets even worse when the said person works full time and only do laundry when the sun has set...  And in winter, it means 5 PM.


When I was in my first maternity leave in 2007  ( my son will be 4yo in a few days!), I was scared to use the dryer for my son's diapers, and I had a little drying rack.  It went well, until stains began to bother me. 

Then I had the IDEA:  window drying !  I would use clothespins to hang stained diapers to my curtains, in my most exposed to the sun windows.

Clothespin, diaper, curtain and a sun exposed window, that's all you need!
I must admit if the said window is facing the street, it can look weird a little bit...  And if one day you don't find a diaper you need, look  behind your curtains.  I had the bad habit to forget I hat put diapers to dry and de-stain.

Does it work ?  Yes it does, but it can take more time to dry and get the stains off in snowy January than sunny July.

If satin are not an issue, but you like to reduce machine drying time, or you still have a few diapers not entirely dry, here is an other money wise option:

Clothes hangers with clips!  !

Kids cloth hangers!  We always have too many of them at home!  Very practical.  Each hanger can hold 2 items, one per clip.  I usually hang them on hooks or wherever  I can in my smallish laundry room.

Not only for diapers, but also for trainers, cloth pads ( there is one in the far right of the picture)

That way I must admit it is less visible for the neighbours, and they are still easy to see for me :)


That's all for today:)

P.S. : Sorry for the bad lighting.  I do prepare my blog articles at night, and the light in the laundry room would NOT cooperate today...

P.S. 2 : See you tomorrow!  I'll share with you one of my favorite recipe.  Something yummy, a dessert.

Monday, July 5, 2010

Daycare and Cloth 101

When I got a place in daycare for my oldest 2 years ago, it was obvious for me that we would keep using our cloth diapers.


Unfortunately, as I learned along the way, not all daycare centers are willing to change cloth diapers. Here are most frequent reasons I’ve compiled with a few friends:

- We don’t have time to wash them ( They don’t have to… I will)
- It is dirty, unsanitary ( Hey, we wash them… I don’t buy new undies for me every week… I’ve had way more blowout in disposables than cloth)
- They stink ( Not if washed properly… Actually it smells less than a disposable)
- It can spread infections ( I usually don’t bring my kids when they are sick…)
- It is more complicated than disposables ( They don’t know AIOs and pocket diapers…)
- We don’t want to deal with pins ( They don’t know AIOs and pocket diapers…)


Here is what we did to have them ACCEPT our cloth diapers:

• Ask yourself which is you EASIEST-TO-USE aka daddy’s favorite diaper. You know, that pocket or AIO with VELCROS… Caretakers are more willing to accept to use these.
• If you have more than one in this category, choose the prettiest one.
• When you go visit your future daycare center, bring this diaper with you, along with a wetbag.
• Gently ask the caretaker if you can ask her something, and explain that you use cloth at home and were wondering if it is possible to use it there too. SHOW the diaper and how easy to use it is.
• Explain that they only have to throw it in the wet bag, and they don’t even have to empty it. You bring back home the dirty diapers and empty them yourself in the toilet, even BM. The only difference with a disposable is throwing it into a wetbag instead of a diapergenie thing.
• If they have a door to the outside in their room, but no toilet, tell them they can put the bag outside.


Here, I had to ask to the «principal» of the daycare to get a few weeks of tryouts. And in the end they liked it.

My daily checklist:

• 5 clean and ready pocket diapers ( I mostly had Bumgenius diapers in the beginning) in a mesh bag
• 1 small wetbag for dirty diapers
• 1 small jar of cloth compatible diaper rash cream, just in case. Here I needed to have it prescribed by a doctor since I was not using Zincofax…
• A spare pair of pants just in case ( all kids should have that anyways)

A few more tips:

• If it is summer or if you live in a hotter climate (i.e., not in Canada…), you might want to consider having a wetbag that has a zipper so insect won’t go in it. Don’t ask why I know that.
• Having from 12-15 diapers exclusively for daycare is a good idea. From the 5 I leave in the bag in the morning, 3 or 4 are usually dirty at the end of the day, sometimes 5. This way I can wash every 2 or 3 days.
• Same type of closure for all diapers is best. Some will prefer side-snapping or front snapping, others will prefer velcros. Don’t confuse them, stay consistent…
• First diaper in the morning can be whatever closure you like since they only have to take it off.
• Ask them what is their diaper changing routine, how many times a day. It will help you figure out how many diapers you will need.
• Give them a reminder sheet (No zinc, put in the wetbag…)
• Be ready to lose 1 or 2 diapers in the year. When they change 6-7 diapers in a row, they can get distracted.
• Keep you diaper clean and without weird smells.


I hope that help :)


Marie-Aude, from Colibi Créations
Related Posts Plugin for WordPress, Blogger...