Thursday, October 27, 2011

Boulevard Designs Giveaway Winner


And the Winner is...


Angie!
Don't forget that you can get your own fleece covers, fitted diapers, and more from Sarah at Boulevard Designs on Etsy!


Wednesday, October 26, 2011

Wet Bag with Style!

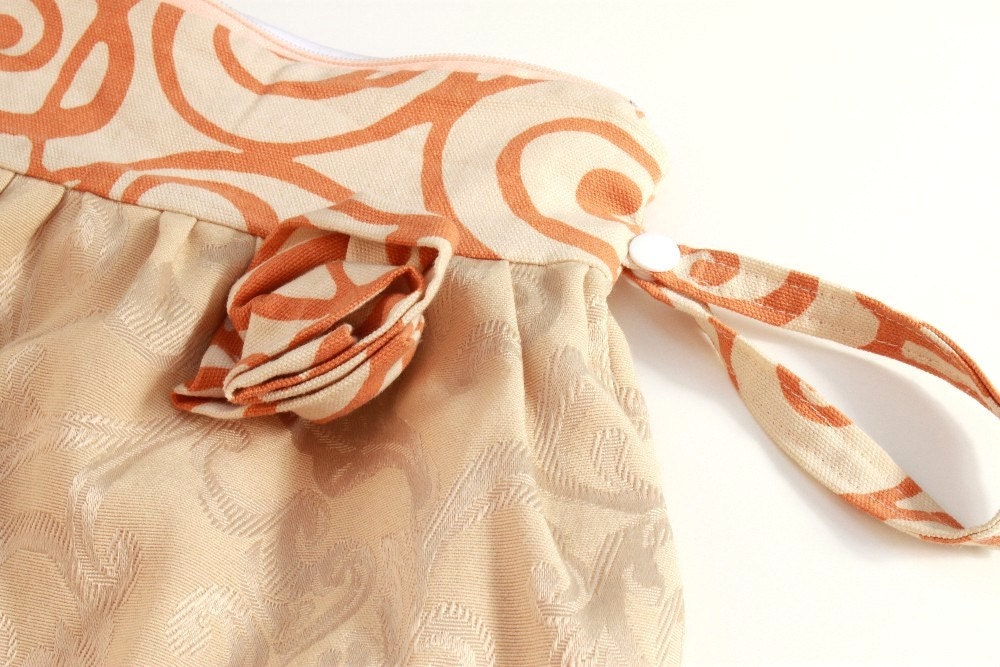
Today we are featuring a very stylish clutch wet bag from Bright Rose Creations. As you can see by the picture, this is not your ordinary wet bag.  I was talking with Sharon, shop owner, about her design.  She said,   "I was basically in the mood for something girly, so I made a girly wet bag!". The fabric rose, while cute she knew was not practical with the amount of washings a wet bag goes through, so she made it to snap off for washing! It also has a nice strap for hanging dry.


Sharon has been making cloth diapers and supplies for about two years, and selling on Etsy for a little over a year.  I was intrigued by her name and asked her how she came up with it.  Here is her reply, "I am always happiest to create and paint in "Bright" light.  On sunny days, I just want to paint or sew.  "Rose" is my middle name, and also my favorite flower.  And "Creations", because there are so many things that I like to create.  I choose to make things that I really enjoy, and that I find useful for myself, my family, or my pets.  I  create a wide variety of items, using different crafting modalities - sewing, handknitting, painting.  Creations is the catch all term for all of my creative endeavors."

BrightRose Creations also makes custom dog diapers! She has made diapers for 7 pound dogs, and 80 pound dogs! Each one is custom fit.

Sharon has graciously agreed to giveaway a set of 6 washable wipes and a tote bag this week.  Simply follow the directions below for your chance to win these beautiful and useful products from BrightRose Creations.


2 Required entries:

-Follow this blog, etsyclothdiapers.blogspot.com, via Google friend connect. If you are already a follower, just leave a comment saying you already follow. Otherwise, leave a comment saying you are a new follower.
-Visit BrightRose Creations shop; come back here and leave a comment about your favorite item.

Additional optional entries (leave a separate comment for EACH of the following that apply)(be sure that you are signed in or leave a way to contact you in each comment):
- Like BrightRoseCreations on Facebook
- Like the Etsy Cloth Diaper team on Facebook
- Follow the Etsy Cloth Diaper team on Twitter
- Tweet about the giveaway (limit one per day) - be sure to use @etsyclothdiaper in your tweet

-Post about the giveaway on your own blog.


Giveaway closes at 11:59pm EST on November 2nd.

Winner will be announced on this blog on Thursday Oct. 3rd.


A random blog comment number will be selected using random.org. You MUST comment on this blog post to be entered, and have contact info in your profile. Each entry entry must be its own comment. If you combine entries into one comment, it will only count as one entry. Winning entries will be validated, and you MUST do the required entry to have any additional entries be valid. Thank you for entering!

Sunday, October 23, 2011

Five Tips for a Greener Halloween


Many of us try to do our part for the planet, but when faced with a holiday it's easy to slip back into old habits and forget to make "green" choices. Here are five quick and easy ways to "green up" your Halloween celebration.

1. Light up the night the eco way - with LED or solar-powered lights yard lights. Don't forget to replace your porch light with a CFL bulb too!

2. Host a costume swap and invite everyone you know. Plan to repeat every year for an endless supply of "new" costumes for your children, your husband, maybe even the dog.

3. Get crafty and do it yourself! Making your own costumes and decorations is fun, and saves money too. A quick search on the internet will give you more ideas than you'll have time or energy for.

4. Pick a huge pumpkin and let each member of the family contribute instead of buying multiple pumpkins that will just be thrown away.

5. Take a hike and walk around the neighborhood instead of driving house to house or street to street. Not only is it better for the environment, it's better for your health too.

Challenge yourself to see how plastic-free you can be this Halloween. I know my family won't be able to go 100% plastic free, but I'm going to see how creative we can get to avoid using plastic as much as possible.

What are your favorite Green Halloween tips?


Image credit: http://carolbrowne.com/

Saturday, October 22, 2011

How to make... a doll carrier

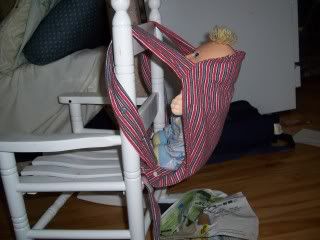
Making a doll carrier is easier than it looks.  It can make a great gift for toddlers and kids who want to do just like mommy (or daddy).  With the Holidays approaching ( I know we are still in October... ), it can make a great gift for toddlers and kids who want to do just like mommy (or daddy).

I made this one for my son when he asked to carry his one doll like I carried his baby sister.  Ok, I'll make you one, I said.  And naturally, when I was done, he did not want to use it anymore...

Please note that the carriers made with this tutorial are intended to carry dolls and stuffed toys, not real babies or child.

Anyways, here is how I made it, with upcycled fabric!

I took a men's flannel pj( you know, those with 2 inches hem...), so I could use the hem for the main piece:
  1. Cut one of the legs to make a 12in *16 in rectangle, keeping the big hem at the bottom.  Then a second piece that will be 2 inches shorter ( the one with the horizontal lines), so 12*14( if you serge the hem), or add a small hem allowance on that piece only.


  2.  Fold your pieces in half, and 2-3 inches from the top, cut a curve.
  3. Cut 2 : 4*20 inches ( straps) and one 3*28 inches ( waist band) from your fabric.  Ignore the white thing on the picture.
  4. Right side together, sew or serge along the long edge of the 3 long pieces, and turn right side out. Seam allowance is 1/4 in.
  5. Take you 12*14 pannel, and serge/overcast/hem the straight bottom part to prevent fraying.
  6. Make the straps:  Take the 2 20 inches tube and insert something to make them thicker, either some fleece, batting, or, like I did, some UNSTRETCHED Fold Over Elastic ( FOE).  Let both ends of the FOE show at the extremities.
  7. Sew a straight line on the straps to hold your «batting» in place, NO stretching.
  8. Take your 2 panels, right side together, and pin each strap  in the curve of the panels.  The straps will be hidden between the panels at this time and they will have a loose end.  Make sure that the extremities that will be sewn  show outside for 1/2 inch, like in the picture.
  9. Sew the 2 long sides and the curve together, like a U.  DO NOT SEW the bottom yet, you still need it to be open.
  10. Clip curves and turn. Topstitch the 3 sides you've just sewn.  You can also reinforce the straps at this point.
  11. On the shorter pannel ( the one you serged or hemmed the bottom edge), pin each loose strap ends 3/4 inch on the wrong side of the bottom edge of the fabric, approximately 1/2 in from the the side seam.  Make sure the straps are not twisted.  
  12. Sew each strap in place.
  13. Prepare your snapping material.  For each strap you will need 3 caps, 1 stud and 2 sockets.
  14. Put one CAP on the 3/4 inch hidden end of strap ( used as reinforcement), and one STUD or the right side of fabric. Snap.  Repeat for strap # 2.
  15. Take you 3*28 inches tube  and insert it in the big hem the the bottom of your bigger panel, and center it so each side is equal.
  16. Cut a 8 inch long piece of FOE or 1 inch wide elastic, insert it into the hem, pin and sew at each extremity of the hem.
  17. Now you can close the 2 panels together by sewing the shorter pannel to the longer one.  On the picture, I sew directly on my serged edge, as close as I can to the big hem. This side is the INNER side.
  18. Decide if you want the waistband to fasten with a knot or with velcro closure ( easier for toddlers).  If you decide on knots, just finish the raw edge and your alomsot done ( ie. see you in step 22 )  If you want velcro closure, keep reading:
  19. Cut your waistband shorter ( I did cut 3 inches on each side) and finish the raw edge.
  20. Sew a 1.5 inch HOOK velcro  at the end of one waistband strap, on the inner side ( toward the wearer).
  21. Hook is on the let side of the picture.
  22. Sew a longer LOOP velcro on the outer side of the opposite strap, closer to the main panel if you have a skinny toddler, like mine.  If you have some loop tape, it is even better, as you won't have to sew your velcro again as you child grow up.
  23. Now, back to snaps! You will apply 2 SOCKETS at the bottom of each strap ( the socket facing the wearer, so it is also facing the stud...), spacing them approximately 3 inches.  This will allow for your 2 years old as well as your 6 years old to wear it easily.
Et voilà!


Related Posts Plugin for WordPress, Blogger...