Showing posts with label other accessories. Show all posts

Saturday, October 22, 2011

How to make... a doll carrier

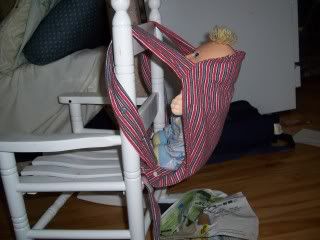
Making a doll carrier is easier than it looks.  It can make a great gift for toddlers and kids who want to do just like mommy (or daddy).  With the Holidays approaching ( I know we are still in October... ), it can make a great gift for toddlers and kids who want to do just like mommy (or daddy).

I made this one for my son when he asked to carry his one doll like I carried his baby sister.  Ok, I'll make you one, I said.  And naturally, when I was done, he did not want to use it anymore...

Please note that the carriers made with this tutorial are intended to carry dolls and stuffed toys, not real babies or child.

Anyways, here is how I made it, with upcycled fabric!

I took a men's flannel pj( you know, those with 2 inches hem...), so I could use the hem for the main piece:
  1. Cut one of the legs to make a 12in *16 in rectangle, keeping the big hem at the bottom.  Then a second piece that will be 2 inches shorter ( the one with the horizontal lines), so 12*14( if you serge the hem), or add a small hem allowance on that piece only.


  2.  Fold your pieces in half, and 2-3 inches from the top, cut a curve.
  3. Cut 2 : 4*20 inches ( straps) and one 3*28 inches ( waist band) from your fabric.  Ignore the white thing on the picture.
  4. Right side together, sew or serge along the long edge of the 3 long pieces, and turn right side out. Seam allowance is 1/4 in.
  5. Take you 12*14 pannel, and serge/overcast/hem the straight bottom part to prevent fraying.
  6. Make the straps:  Take the 2 20 inches tube and insert something to make them thicker, either some fleece, batting, or, like I did, some UNSTRETCHED Fold Over Elastic ( FOE).  Let both ends of the FOE show at the extremities.
  7. Sew a straight line on the straps to hold your «batting» in place, NO stretching.
  8. Take your 2 panels, right side together, and pin each strap  in the curve of the panels.  The straps will be hidden between the panels at this time and they will have a loose end.  Make sure that the extremities that will be sewn  show outside for 1/2 inch, like in the picture.
  9. Sew the 2 long sides and the curve together, like a U.  DO NOT SEW the bottom yet, you still need it to be open.
  10. Clip curves and turn. Topstitch the 3 sides you've just sewn.  You can also reinforce the straps at this point.
  11. On the shorter pannel ( the one you serged or hemmed the bottom edge), pin each loose strap ends 3/4 inch on the wrong side of the bottom edge of the fabric, approximately 1/2 in from the the side seam.  Make sure the straps are not twisted.  
  12. Sew each strap in place.
  13. Prepare your snapping material.  For each strap you will need 3 caps, 1 stud and 2 sockets.
  14. Put one CAP on the 3/4 inch hidden end of strap ( used as reinforcement), and one STUD or the right side of fabric. Snap.  Repeat for strap # 2.
  15. Take you 3*28 inches tube  and insert it in the big hem the the bottom of your bigger panel, and center it so each side is equal.
  16. Cut a 8 inch long piece of FOE or 1 inch wide elastic, insert it into the hem, pin and sew at each extremity of the hem.
  17. Now you can close the 2 panels together by sewing the shorter pannel to the longer one.  On the picture, I sew directly on my serged edge, as close as I can to the big hem. This side is the INNER side.
  18. Decide if you want the waistband to fasten with a knot or with velcro closure ( easier for toddlers).  If you decide on knots, just finish the raw edge and your alomsot done ( ie. see you in step 22 )  If you want velcro closure, keep reading:
  19. Cut your waistband shorter ( I did cut 3 inches on each side) and finish the raw edge.
  20. Sew a 1.5 inch HOOK velcro  at the end of one waistband strap, on the inner side ( toward the wearer).
  21. Hook is on the let side of the picture.
  22. Sew a longer LOOP velcro on the outer side of the opposite strap, closer to the main panel if you have a skinny toddler, like mine.  If you have some loop tape, it is even better, as you won't have to sew your velcro again as you child grow up.
  23. Now, back to snaps! You will apply 2 SOCKETS at the bottom of each strap ( the socket facing the wearer, so it is also facing the stud...), spacing them approximately 3 inches.  This will allow for your 2 years old as well as your 6 years old to wear it easily.
Et voilĂ !


Monday, December 6, 2010

Cloth Diaper Starter Stash

There are a thousand different lists on various sites, some complicated and some simple, concerning what you need to start using cloth diapers; how many to keep in rotation, and what accessories are essential. Since there are so many opinions, it might seem like this is a complicated, highly subjective issue, but it is really pretty simple. (If you don't believe me, skip to the bottom of the post)

You need as many diapers as your baby will wear in two days, plus 2 or 3 extras for those days when they need extra changes, or to wear during the laundry. Most will agree that 24 is Newborns will go through 10-14 diapers in a day, so you might want a few more. As baby grows he or she will need fewer and fewer changes throughout the day, and you will use less, but it never hurts to have extra.

Some may argue that a larger stash allows you to do laundry less often, but most diaper manufacturers recommend washing every other day. Going longer in between washes leaves stains, and staying wet so long can break down fabric fibers. Who with a house full of kids can go much longer without the laundry taking over anyway? Even detergent companies, and other sources for laundry instructions recommend washing in loads of no more than 24 diapers.

Next, if you are using prefolds, or fitteds, you will also need covers. I have heard many people recommend six, but Baby Beehinds has the best explanation for this number, "We recommend rotating between two covers throughout the day- one worn by baby, and one airing after you've done a nappy change, with one clean spare cover in case of an accident and then the other in the wash. The other 2 are for night time use; one tonight, the other tomorrow night. Hence the need for at least 6 covers. It really does make life easier to have the recommended number of covers on hand- it is very frustrating when you discover that you don't have enough because they are all in the wash!"

As far as accessories are concerned it is up to you. Starter Stash implies the basic requirements, so we'll start there.

The only things, besides diapers, that you need to use cloth instead of disposables are a place to put your laundry, both at home and on the go, and cloth diaper approved detergent. If yo want you can just use any plastic trash can with a lid for your diapers pail, but most people feel it is a lot easier if you have a pail liner you can throw in the wash with your diapers and not have to wash the pail each time. You will also need a wet bag for bringing wet diapers home when you are out.

Cloth Diapers can't be washed with detergents that have softener, brighteners, or enzymes as these leave a residue that will cause your diapers to smell bad after a while and/or repel water. We love Allen's Naturally Biodegradable, but there are many brands. Country Save is another that is very popular. You can look in the laundry section on cloth diaper websites, or even look on Google to find homemade recipes.

Beyond that you may choose to use cloth wipes, which is really no extra trouble, in which case you would need a container to put them in and possibly a solution for them, although you can wet as many as you use in a day or two with just water without them mildewing.

The other main concern is what to do about poop. Newborn poop can be put straight into the wash, and most solids can just be shaken off into the toilet. As far as stickier situations, you may choose to get a diaper sprayer, or use fleece or flushable liners to keep your diapers cleaner.

So I said this was simple, and then gave you several paragraphs, but it's all to say this:

24 diapers per baby
6 covers for every 24 non-waterproof diapers
2 pail liners (so you have one to use when the other is in the wash)
2 wet bags

Optional:
2-3 dozen wipes
recycled wipes container
wipes solution
diaper sprayer
liners

You can find nearly all of these things in EtsyClothDiaper team shops. Just click on the links to the left!

Sunday, March 29, 2009

Easter Leg Warmers at Laina's Laundry!

I know these aren't actually diapers, but so many cloth diapering moms love leg warmers because you don't have to deal with pulling pants on and off over bulky cloth diapered bottoms! Plus they are just super cute! I just listed some white leggings at my shop, www.LainasLaundry.etsy.com. They would be just perfect with your little girl's Easter dress! I have one pair in each - toddler and infant size.

Friday, August 22, 2008

Visit Laina's Laundry Oct 4th in Littleton, CO!

Laina's Laundry will be selling baby leggings, cloth diapers, and baby/toddler dresses at the Craft Fair in Littleton, CO on October 4th (at Ketring Park). If anyone is in the area, please stop by and say "hi" and check out our stuff, along with bibs and burpies by Stella Bini! We will be in booth #21. We look forward to seeing you there!

If you can't make it to the fair, all remaining items will be posted on our Etsy shops after October 4th so be sure to check back then!

Thursday, March 6, 2008

Let's Try out The Label Thing ...


I've made some cute little Kimono Shoes ...
they will SO look sweet with cloth diapers and
wool soakers and
onesies!

You can see them for yourself at my Etsy ... Betriska.com
Related Posts Plugin for WordPress, Blogger...